This information was compiled form the website NotPurfect website.
Barrels in the dan Wesson are fairly easily changed. There are only two special tools required. The first is a barrel wrench which engages two notches in the barrel nut at the muzzle. The second is a feeler gauge, a sort of shim, which goes between the barrel and cylinder to set the gap. There are three types of barrel wrenches. The first is designed for the original pistols with the exposed barrel nut. it is essentially a hex wrench. The other two are designed for the new style with the recessed barrel nut. Current production barrel wrenches bear a resemblance to a door knob, while the older style looks a bit like an old time cork screw. The whole procedure is pretty simple, and only takes five minutes. Because I wanted to show some details, I may have made the process seem more time consuming than it actually is.
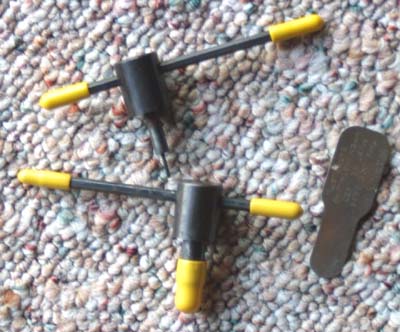 |
| In order to change a Dan Wesson barrel, you will need a barrel wrench, and a gap tool. You will only need one wrench. Of the two shown in this photo, one is for the 22, and the other is for the 357. The feeler gauge is the sliver of metal shown to the right of the photo. It is .006″. the Dan Wesson company emphasizes that you must use the feeler gauge when changing barrels. |
 |
| Shown here is everything needed to change from a 6 inch barrel to a two inch barrel. |
 |
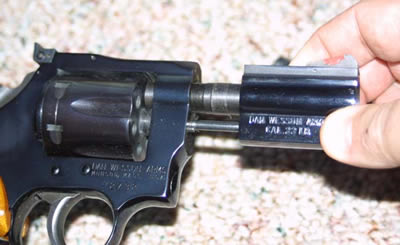
| The barrel wrench shown alongside the muzzle. The two notches on the barrel nut mate with a pair of cams in the wrench. In the absence of a barrel wrench, I have used needle nose pliers to mate with the notches in the barrel nut, but I absolutely do not recommend this as it can tear up the nut. |
 |
| Using the special tool, loosen and remove the barrel nut from the muzzle. They generally come out pretty easily, but occasionally some muscle will be required. |
 |
| A view of the muzzle with the barrel nut removed. The powder seen inside of the shroud is from grease, put in at the factory when the gun was manufactured over 25 years ago. |
 |
| After removing the barrel nut, pull the barrel shroud off of the barrel. |
 |
| With the barrel shroud removed, it is a simple matter to unscrew the barrel tube from the frame. |
 |
| A side view of the Dan Wesson medium revolver frame (22 version) with the barrel removed. |
 |
| A front view of the medium revolver frame with the barrel removed. Those 22 caliber holes look pretty small in this 357 sized cylinder and frame. |
 |
| Parts are scattered around the work area. Seen in the photo are shrouds, barrels, and barrel nuts for the 2.5, and 6 inch barrels, as well as the barrel wrench, and the feeler gauge. I am about to put the shorter barrel in place. |
 |
| The first step is to screw in the new barrel tube. |
 |
| Using the feeler gauge, adjust the barrel cylinder gap by snugging the barrel up against gauge. |
 |
| The barrel is snugged up against the gauge as it is held in place against the cylinder. The barrel is tightened until it is resting on the gauge, but still lose enough to allow easy removal. The gauge is then withdrawn, as the gap is then properly set. |
 |
| With the barrel properly installed, place the shroud over the barrel. It will line up with an index pin on the front of the frame. |
 |
| Center, replace, and tighten the barrel nut. |
 |
| Use the barrel wrench to recess, and tighten the nut. There should be not play in the nut or the barrel. Every few months it is a good idea to snug up the nut, and to use the feeler gauge to check the gap. |
 |
| Sights may need some adjustment. This is easily done. The barrel tool also doubles as a sight tool. |
 |
| I now have a 22 snub nose (with, admittedly, overly large grips) where I had formerly possessed a 22 target revolver with a six inch barrel. The Dan Wesson is a wonderful gun, and a remarkable design. |
 |
| The large, hand filling target grips are great for accuracy, but do not do much for the concealability of the pistol, once the shorter barrel is in place. A single screw holds the grips in place, and it is easily removed, using the barrel tool. |
 |
| The two inch Dan Wesson, awaiting a more appropriately sized set of grips. |
 |
| Here is everything needed to change the grips. Note that these are all one piece grips, held in place with a single screw, shown below the frame. |
 |
| After sliding the new grips over the nub at the bottom of the frame, the grips screw is slid in place, and then tightened with the barrel tool (also known, appropriately enough, as the combination tool). |
 |
| The new grips, make the little two inch gun a bit easier to conceal, and more streamlined. They also are better proportioned to the shorter barrel. |