December 26, 2010
 Offline
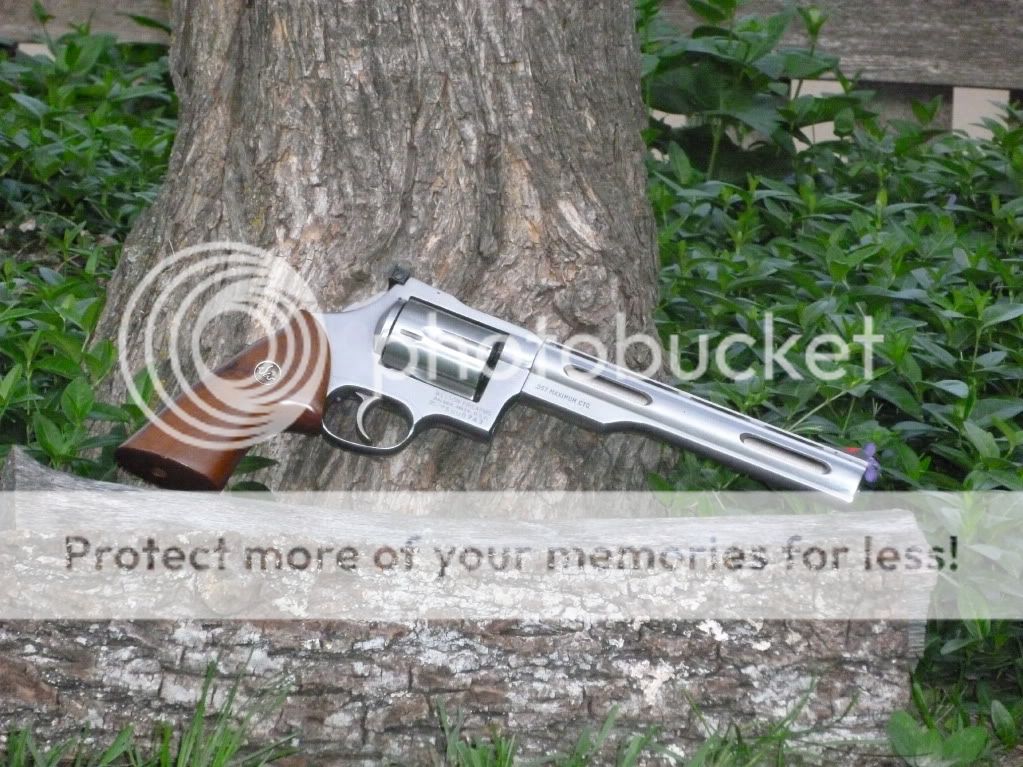
You may remember I purchased my 740 about 8 weeks ago.
The bobbed hammer and the grey look were slight hints of what was in store for me.
Some test firing revealed very inconsistent ability to light a primer.
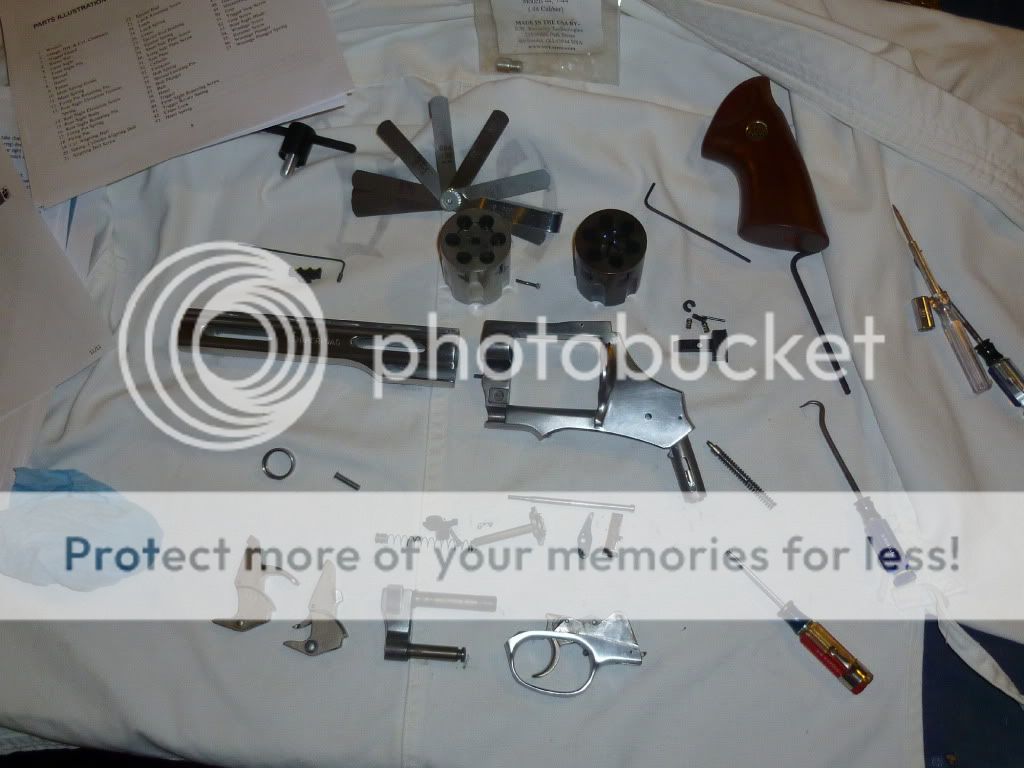
So I started disassembly.
Getting this far revealed several problems. First it was filthy inside, second key springs had been clipped, third a horrible trigger job had been done and while not mechanical, a little Mothers revealed grind marks so deep my fingernail would catch on them.
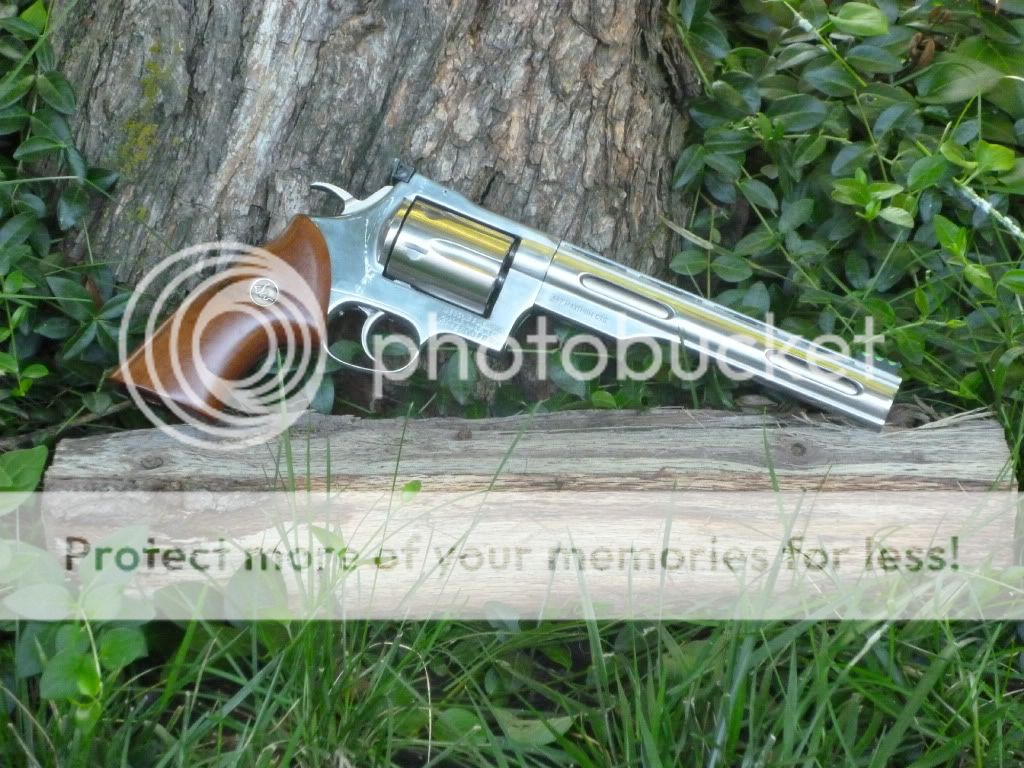
So out came the 1000 grit wet/dry and I picked up some 2500 grit. A lot of elbow grease later it looks a lot better (nowhere near perfect, but a lot better)
I cleaned the frame up a little more after that pic. The haze around the trigger and in front of the cylinder is now gone. I'd get it perfect but I want to shoot this thing rather than spend another month polishing it. I can work on it more this coming winter.
You may have noticed the spare cylinder above. That is new from the factory. Believe it or not, it is stainless. They sell them unpolished. Actually all the new parts have needed final finishing. Priscilla said that is on purpose. They want everything fitted to the gun it goes into.
The new trigger is on the right. There are some obvious differences but the new one feels good in the gun. The result of the poor trigger job really shows on the part that contacts the strut. Notice how much shorter the contact curve is and note how fast it drops off. What you can't see is that it isn't really a curve. Whoever did it made it a series of straight lines. Sheesh!
Here is the old trigger from another angle. It really is uneven from side to side. And that is after I cleaned it up with some 2500 grit. I polished the new trigger with 2500 grit sandpaper, just enough to smooth it. It is shinier than it was but not the high gloss of the old trigger.
I didn't take a picture of the springs. The trigger spring and the hammer spring had been really bobbed. They were about 1/4" to 3/8" shorter than the replacements. It's amazing the gun fired at all. The hammer really drops with authority now. This weekend will tell for sure but I can't believe I'll have a FTF. While double action is pretty heavy, single action is pretty light. I don't have a gauge but it is almost as light as my S&W M60 which has had a professional trigger job. It's going to be a delight to shoot in single action.
I'm going to have to take it apart one more time. My gunsmith says itneeds a new hand. Yep, the prior owner hacked that also. In a really slow DA, it's too short to fully turn the cylinder.  Glad he pointed that out to me. Could have been ugly if the primer had been ignited.
Looking forward to the weekend. This is going to be fun. 


Many thanks to all who have shared their knowledge. The large frame disassemble thread, the average Joe 15-2 tune up thread and the cleaning your Dan thread were especially helpful.
I'll get a pic of assembled gun up soon. Right now I'm so excited I just keep looking at it. Sweeeetttt! 

Dans Club
March 2, 2008
 Offline
It looks like you have done some really nice work. You might try some Mothers Mag and Aluminum Wheel polish for the final, high gloss touch on that stainless.
I went to a bookstore and asked the saleswoman "Were is the Self Help Section?" She said if she told me, it would defeat the purpose.
George Carlin
Range Officer

Range Officers

Dans Club
March 27, 2009
 Offline
DWF Supporters

Dans Club

Moderators
November 17, 2008
 Offline
December 26, 2010
 Offline
Thanks guys. I took one of her assembled this morning. It's funny how the grind marks don't show at some angles and do at others. Still, the finish is much better. 
I want to get a new grip for it also. How do you think an LB Special in Birdseye Maple would look? That would be light wood on a bright frame. Or maybe a grainy wood like oak painted black? Of course it does look pretty good in the stock grip but I'd like to save wear and tear on that one.
Only four more days till the weekend. 


Supporter

Moderators
January 24, 2009
 Offline
Dans Club
March 2, 2008
 Offline
Personal opinion of grip for a shiny, bright SS gun is something darker.
Dark Zebra, Dark Walnut, Bloodwood, a nice rich dark cherry, etc.
For a 740, definitely a fingergroove style.
I went to a bookstore and asked the saleswoman "Were is the Self Help Section?" She said if she told me, it would defeat the purpose.
George Carlin
Range Officer

Range Officers

Dans Club
February 28, 2009
 Offline
Nice restoration job. I like the LB Special grip. It really fits my hand well and the addition of finger groves helps with control. I'm considering a birdseye maple grip in the LBS style for my 722M.
I'm not sure about it but zebrawood looks good on SS guns so why not.
-Mike
December 26, 2010
 Offline
Thanks guys. I'm definitely going with the LB Special. I just can't make up my mind on the color. That means if money allows, I should get one light and one dark. 
Indoor Range Report
<SMC> Spontaneous Maniacal Chuckle
There were lots of <SMC>'s during shooting, checking out and all the way home. Miscellaneous <SMC>'s this morning. 
She lit every round. Single action is sweet. Not as sweet as my gunsmith worked S&W M60 but close. Truthfully my S&W trigger would be too light for this one.
This bad boy is loud!! I doubled up on hearing protection and it was no problem but I had people's attention at the range, and I was only firing regular magnum's. 
It is shooting low, even when I set the rear sight as low as it would go. That at least got me on the paper. I was able to get one group of five within 2" at 15 yards. The gun will do its part if I do mine. It is hard to see with my old eyes in that dark. The rear sight blade was shaking loose. Interestingly, the felt recoil is minimal. This gun is so heavy that it really controls the jumping.
I outlined a Ruger Blackhawk rear sight last night when I got home and installed it this morning. My boy and I are off to the outdoor range in a few minutes. I'll post another report and hopefully some pics tonight.
Overall, it is a great gun. I'm very glad to have it. Once I get the sights sorted out I can get some serious distance practice. Eventually I want to be able to put 6 shots in an 8" or less circle at a 100 yards. (Right now, I'd be doing well to get 1 on the paper at that distance.  )
)
Thank you for the help and encouragement. This one would have needed a good gunsmith if it wasn't for you guys.
Jody, thank you very much for this forum. I'm really enjoying my two DW's. If it wasn't for your forum, I wouldn't know enough to have bought even one.
Off to 


Maybe I'll even put some some SM through it today 


Range Officer

Range Officers

Dans Club
March 27, 2009
 Offline
December 26, 2010
 Offline
Blacktop said:
Huhh...you need to raise the rear if she is shooting low. or did you mean it
the other way ?
-Blacktop
Unfortunately, I meant what I said. I should have prefaced it by saying I don't know what I'm talking about. 
Help me understand please. I am trying to visualize the effects of adjusting the rear sight. If the sights were set for 25 yards, theoretically a straight line from the center of the barrel would intersect a straight line from the sights at 25 yards. If the front sight is fixed and the rear sight is lowered, the intersection of the lines should be further out than 25 yards right? What am I missing. Thank you.
December 26, 2010
 Offline
Outdoor range report:
Wow! What a difference between shooting in a dark indoor range and a covered outside range. The front sight I struggled to see inside visually popped into view, especially the green fiber optic, when outside. (Thanks Eric. Your fiber optic sight works great outside.  And it helps inside; the indoor range I go to is just dark.)
Interestingly, I didn't even notice the painted outline on the rear sight once I got outside. The Ruger rear sight passed its first experience, i.e., the blade didn't shake loose like the stock rear sight. The Ruger sight does sit lower than the stock sight. Remember that I obviously don't know what I'm doing with adjusting these but the gun is now shooting high. (One advantage of shooting outside against a dirt berm is when I missed the target completely I could tell by the dust kicked up whether I was high or low.)
I put 25 regular magnums downrange. I got the later shots on paper by raising the rear sight and aiming low (Remember I don't know what I'm doing with these adjustments. I might have been compensating for an improper adjustment by aiming to a lower spot.)
The gun lit every one on the first strike. In single action, this thing is fun to shoot, not 22 plinking fun, but easy trigger pull, big boom fun. (As Heather says, "I like a big boom!"  )
)
No double action yet as I'm still waiting on the new hand.  It should be here this week.
I also put 4 SM downrange. I wanted to see the difference but it probably isn't a fair comparison. These were from the prior owner (Hey, he messed up the gun, how good could the ammo be?  ) Seemed slightly more powerful than the regular magnum. The box is marked as 180 grain bullets with 1,640 fps. (One of the rounds I had to strike twice. A fifth round wouldn't light. The firing pin is hitting every round dead center and deep, remember I have an untrained eye. I'm convinced it's the old ammo and not the gun.)
The spent SM's do stick in the cylinder. I had to push a couple of them out with a screwdriver. They come out easier after they have cooled a few minutes. I'll finish polishing up the cylinder I got for them. I need to think of some type of engraving for it so I don't get the two cylinders confused. Hey Jody, may I use the DWF script followed by 357 Supermag in the same font? That could look real cool in between the flutes. No big deal if you would rather I didn't.
All in all, it was a great experience. I've got to learn more about adjusting the sights. It is awfully hard to hit a target by aiming to miss it.  There is just something wrong with doing that.
I know I need to get pics up. I'm guessing you want to especially see the Ruger rear sight. I've got to go to work now and then to my moms. I'll get them up tonight.
Thanks again for all the help and encouragement on this.
Supporter

Moderators
January 24, 2009
 Offline
95XL883 said:
Help me understand please. I am trying to visualize the effects of adjusting the rear sight. If the sights were set for 25 yards, theoretically a straight line from the center of the barrel would intersect a straight line from the sights at 25 yards. If the front sight is fixed and the rear sight is lowered, the intersection of the lines should be further out than 25 yards right? What am I missing. Thank you.
The easiest way for me to remember is to; raise the rear sight, to raise the POI (point of impact). Lower the rear, to lower the POI.
By raising the rear sight, you'll automatically raise the barrel of the gun to line up your sights when shooting. 
February 11, 2010
 Offline
Steve's got you straight on the adjustment. Now what are you seeing
when you aim that hog leg ?
I like the old "pumpkin on the post" way of aiming these days.
That would be image 1 in these pics, now I use to use the number
2 image early in the day but that's before I knew any better.
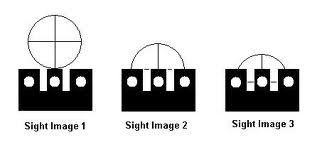
Here's another example :
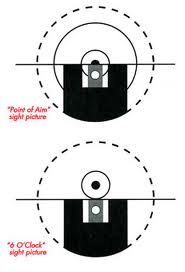
Any of these styles is your personal choice, I perfer a combat style
and that allows you to see the target and what the target may or may
not be doing at all times. Also most gun manufacture instruction booklets
will diagram the "P.O.T.P." or '6 O'Clock style as well.
-Blacktop

December 26, 2010
 Offline
Okay, I think I see where I misunderstood the sight to barrel relation. Because the front sight is fixed (mostly), by raising or lowering the rear sight, the angle of the barrel changes. In other words, once the rear sight is raised, the front of the gun has to be angled higher to get the dot in the same position and thus the barrel is pointed higher. (I can reverse my fiber optic side and have some effect as one end is higher than the other. This is what I meant when I referred to the front sight being mostly fixed.) Let's try looking at a pic. 

Looking at it this way it is easier for me to realize that if I raise the rear sight then I also have to angle the gun higher to get the front sight dot in the same visual position relative to the back sight. Similarly, if I "raise" the front sight by reversing it, then I have to lower the angle of the barrel to get the front sight dot in the same visual position relative to the back sight. Blacktop and CF, thanks for helping me understand this. Maybe now I can my 740 sighted in. I just love excuses to go 

 .
.
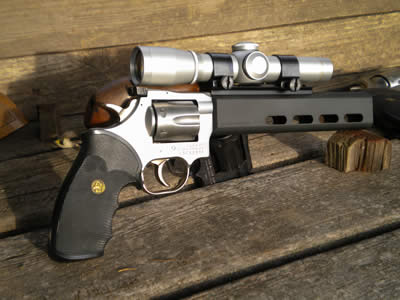
Yes that is the Ruger Blackhawk rear sight. It is a direct bolt-in replacement for the stock DW sight. The blade and adjustment portion is slightly smaller than the DW sight. I outlined the channel with some phosphorescent sight paint. (The outlining helps in the dark but not so much in daylight conditions.)
I like the looks of on the Dan. The Ruger emblem is fairly subtle but if somebody takes more than a casual look they will realize it is not a DW sight. Here are a couple of more pics that show its different profile.
Gratutious alcohol shot
Pics at the range aren't very good. I need to figure out how post videos on YouTube. Maybe it is a Dad thing but my son's exclamations on firing the SM rounds are priceless.
December 26, 2010
 Offline
Okay, got the new hand installed and reversed the front site and lowered the back site as far as it would go. The sights are much better now. 

It was only 15 yards with the gun on a rest but I got every shot on paper. The outlying shots were the first ones but I'm pretty happy with it. My boy was shooting the Model 22 (offhand) at the target to the right. In the spirit of family, some of his rounds came over to play with their big brothers.  (It was hot last night. We were soaked before we were done but we had a great time. I'm not sure who fired what while we were there, but it was louder than my 740. He only fired it once though. My boy was impressed.)
After I was confident in the sights, I had to do the "Dirty Harry" one handed offhand thing. The 740 is so heavy that I didn't feel any recoil shooting 357 Magnums. By the time I got to the last shot I was having to really focus just to keep the gun up. 
I did put six rounds through the Model 22 from a rest at the lower target. Not as tight as Shoot's but still pretty good for this old guy. 
I wish I had taken a pic of the new hand. It was quite a bit larger than what came out. I sanded the flats quite a bit and took the dremel to part of the edge. If you look at the hand in the second picture in my first post, you can see the curve on the upper right portion of the hand. The new hand was straight across. I had to dremel a curve into it so it would function properly. I think I need to do a little more but I didn't want to get carried away with a new part. I'm gaining a new appreciation for gunsmiths. Those guys are artisans and craftsmen.
1 Guest(s)

 Register
 Log In
 Home
Home


